Hardware assembly
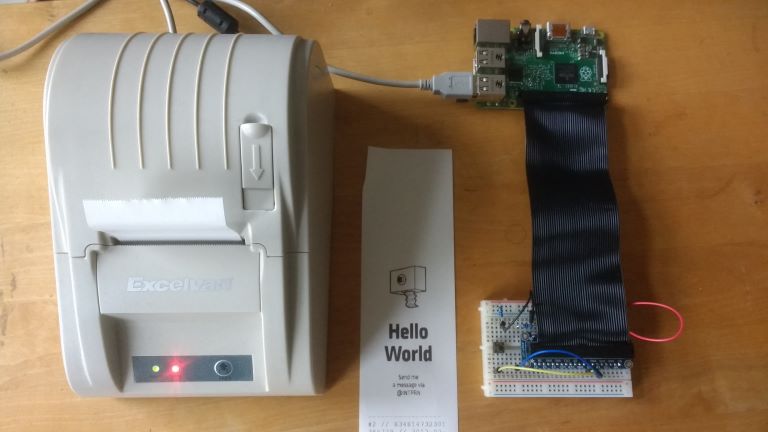
As part of the INTPRN project, we document here the components for a basic setup and their assembly. Other parts of the project are a software script to run a print station and the physical construction of a box/cover for outdoor use.
Components
- Thermal Printer, Model ZJ-5890T (194mm L x 133mm B x 144mm H)
- Raspberry Pi 2 Version B w/WLAN USB Stick and Raspian OS ( 88mm + 12mm WLAN USB Stick = 100m L x 60mm B x 20mm H)
- GPIO Breakout (e.g. Adafruit Assembled Pi Cobbler + Breakout Cable)
- Push button (e.g. Drucktaster T604 = TS695)
- 1k and 10k ohm resistors
- Breadboard (e.g. Breadboard 400(300/100) transparent)
- Cables (e.g. 75 Ex Breadboard Jumper Wires)
- Thermalpaper 58mm x 50m
Pay attention, thermalpaper normally is made with BPA. There is some “concern about the potential hazards of endocrine-disrupting chemicals - including BPA”. Better check out for BPA-free thermalpaper.

Controller
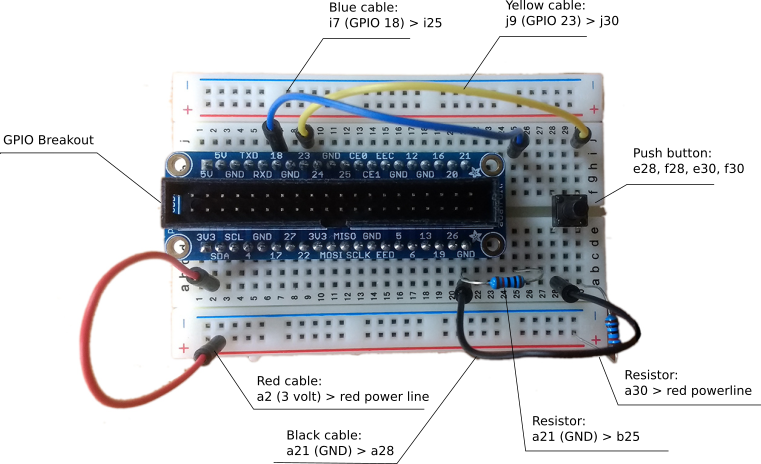
Assemble the breadboard

See the tutorial in Raspberry Pi Workshop: 10. Push Buttons, which we used as a reference for our setup (Thanks to the authors Marcus Schappi and Justy Clayden). Or check a slightly different setup at Raspberry Pi: Button-Input (Taster) (german)
Finally Connect the breadboard to the Raspberry PI with a GPIO Ribbon Cable
Test the setup w/Ruby
To verify the function of the push button, you can test it with a simple Ruby script.
First install some libs and dependencies:
 sudo gem install ruby-gpio
 sudo apt-get install -y ruby-dev
 sudo gem install wiringpi --verbose --no-ri --no-rdoc
Save the following script on the raspi, e.g. at the users home folder:
$ vi pushbutton.rb
  #!/usr/bin/env ruby

  require 'rubygems'
  require 'wiringpi'

  io = WiringPi::GPIO.new do |gpio|
    gpio.pin_mode(4, WiringPi::INPUT)
  end

  # wiringPi 4 == Raspi pin 23
  pin_state = io.digital_read(4)
  # pin_state should be "1"
  puts pin_state

  loop do
   pin_state = io.digital_read(4)
   if pin_state == 0
          puts "push!push!"
   else
          puts "-----"
   end
   io.delay(600)
  end
Save the script and execute it with sudo (‘wiringpi’ insists of superuser-rights)
$ ruby pushbutton.rb
The script will listen if the pushbutton has been pressed (it will read any changes at Raspi pin no. 23) and will give a visual feedback. So if everything is assembled and connected correctly, you’ll get a …
Push!Push!
… everytime you press the pushbutton.
The script is inspired by the tutorial Raspberry Pi Workshop: 8. Blinking a LED, check it for a more detailed explanation of all steps and a table of the different pin numbering of Raspi and wiringPi.
Use the raspi as a print server w/PRNSTN
Proceed to github.com/ut/PRNSTN to install and run the raspi as a printer server with its own social media account.
